ConstraintLayout 1.1 새로운 기능 소개
Percents
1.0에서는 뷰의 크기를 퍼센트로 지정하려면 가이드라인 2개를 이용하거나, ConstraintLayout 대신 PecentLayout을 이용해야만 가능했다. 1.1에서 추가된 속성을 이용하면 뷰의 크기를 쉽게 퍼센트로 지정할 수 있다.
퍼센트를 사용하려면 다음의 사항을 따라야 한다.
layout_width/layout_height를0dp(MATCH_CONSTRAINT) 로 해야한다.layout_constraintWidth_percent/layout_constraintHeight_percent를 이용한다.- 해당 속성의 값은 0 ~ 1 사이의 값이여야 한다.
<Button
    android:layout_width="0dp"
    android:layout_height="0dp"
    app:layout_constraintWidth_percent="0.7"
    app:layout_constraintHeight_percent="0.2" />
Chains
Chain 제약은 여러개의 뷰를 묶어 어떻게 공간에 배치할지를 정하는 조건이다.
Chain으로 묶으려면, 쌍방에 대한 제약조건을 걸면 된다. 수평 / 수직 방향 모두 가능하며, 배치 방법에는 다음의 3가지가 있다.
Chain으로 묶으려면, 쌍방에 대한 제약조건을 걸면 된다. 수평 / 수직 방향 모두 가능하며, 배치 방법에는 다음의 3가지가 있다.
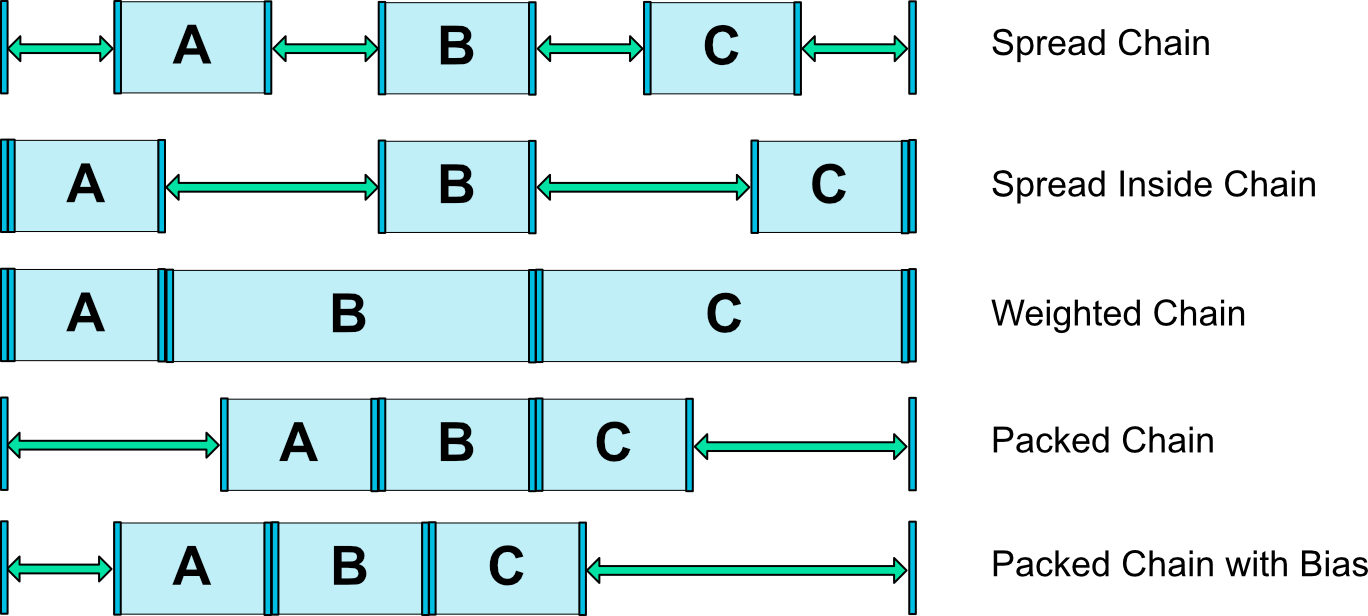
- speard : 기본적인 배치이다.
layout_constraintVertical_weight/layout_constraintHorizontal_weight을 이용하면 LinearLayout의 layout_weight효과를 낼 수 있다. - spread_inside : 공간의 가장자리에 첫번째 부와 마지막 뷰가 배치되고, 남은 사이공간에 나머지 뷰들이 배치된다.
- packed : 묶인 모든 뷰들이 공간의 가운데에 배치된다. bias 속성과 함꼐 사용하면 위치를 조절할 수 있다.
Barriers
Barrier 라는 헬퍼 객체를 이용하여, 뷰들의 크기가 런타임으로 변할때에 적합한 제약조건을 생성할 수 있다.(객체라기보다는 가상의 그룹에 가깝다.) 해당 Barrier에 연관된 뷰들은 크기가 동적으로 변할 수 있고, 크기가 동적으로 변할 때, Barrier에 제약조건을 건 뷰들은 크기 / 위치가 Barrier에 맞게 변경된다. Barrier는 start, top, end, bottom중 하나의 위치로 지정될 수 있다. 해당 객체는 ConstraintLayout에 계층구조로 잡히지 않으며 렌더링되지 않는다.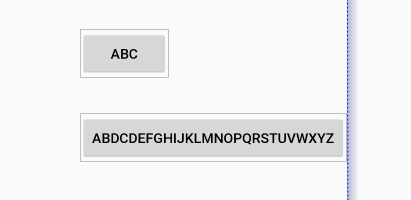
<android.support.constraint.ConstraintLayout
  xmlns:android="http://schemas.android.com/apk/res/android"
  xmlns:app="http://schemas.android.com/apk/res-auto"
  android:layout_width="match_parent"
  android:layout_height="match_parent">

  <TextView
    android:id="@+id/textView1"
    android:layout_width="wrap_content"
    android:layout_height="wrap_content"
    android:layout_marginStart="16dp"
    android:layout_marginTop="16dp"
    android:text="@string/warehouse"
    app:layout_constraintStart_toStartOf="parent"
    app:layout_constraintTop_toTopOf="parent" />

  <TextView
    android:id="@+id/textView2"
    android:layout_width="wrap_content"
    android:layout_height="wrap_content"
    android:layout_marginStart="16dp"
    android:layout_marginTop="8dp"
    android:text="@string/hospital"
    app:layout_constraintStart_toStartOf="parent"
    app:layout_constraintTop_toBottomOf="@+id/textView1" />

  <android.support.constraint.Barrier
    android:id="@+id/barrier7"
    android:layout_width="wrap_content"
    android:layout_height="wrap_content"
    app:barrierDirection="end"
    app:constraint_referenced_ids="textView2,textView1" />

  <TextView
    android:id="@+id/textView3"
    android:layout_width="0dp"
    android:layout_height="wrap_content"
    android:layout_marginStart="8dp"
    android:text="@string/lorem_ipsum"
    app:layout_constraintStart_toEndOf="@+id/barrier7"
    app:layout_constraintTop_toTopOf="parent" />

</android.support.constraint.ConstraintLayout>
Barrier 참고 블로그 : https://constraintlayout.com/basics/barriers.html
Group
Group이라는 헬퍼 객체를 이용해, 몇몇 뷰들을 그룹화 할 수 있다. 그룹화 함으로써 얻는 장점은, visibility 등의 동시적인 작업이 필요할때, 해당 그룹을 이용하여 작업을 수행하면 그룹안의 뷰들에게 전체적으로 적용된다. 해당 객체는 ConstraintLayout에 계층구조로 잡히지 않으며 렌더링되지 않는다.<android.support.constraint.Group
android:id="@+id/profile"
app:constraint_referenced_ids="profile_name,profile_image" />
profile.setVisibility(View.VISIBLE);
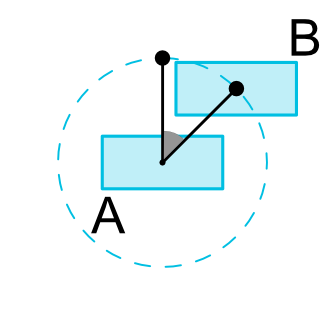
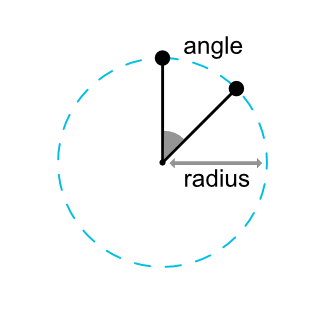
Circular Constraints
기존의 대부분 레이아웃이 수평 / 수직의 배치만 지원한 것에 비해, 원형의 배치를 지원하게 되었다. 원형 배치를 구현하려면 다음을 수행한다.
layout_constraintCircle속성에 구심점이 될 뷰를 지정한다.layout_constraintCircleRadius속성에 구심점으로부터의 거리를 지정한다.(반지름)layout_constraintCircleAngle속성에0 ~ 360사이의 각도값을 지정한다. 12시 방향이 0도이고, 시계방향으로 각도가 늘어난다.
<android.support.design.widget.FloatingActionButton
    android:id="@+id/middle_expanded_fab"
    app:layout_constraintCircle="@+id/fab"
    app:layout_constraintCircleRadius="50dp"
    app:layout_constraintCircleAngle="315" />
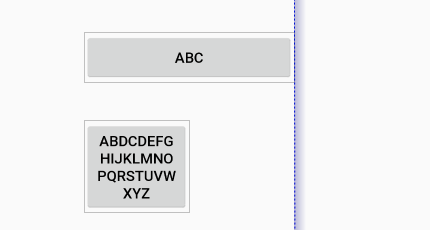
ConstraintSet을 이용한 애니메이션
ConstraintSet을 이용하면 여러개의 뷰들을 한번에 애니메이셔닝 할 수 있다. ConstraintSet은 ConstraintLayout에서의 제약조건들만 가지고 있고, 해당 제약조건들을 ConstraintLayout에 지정함으로써 제약조건들을 갱신할 수 있다.
애니메이션을 수행하려면,
TransitionManager.beginDelayedTransition() API를 이용한다. 이 메서드는 ConstraintSet의 모든 레이아웃의 변경사항을 애니메이션으로 수행한다.
해당 기능에 대해 설명한 비디오
https://www.youtube.com/watch?v=OHcfs6rStRo&feature=youtu.be
https://www.youtube.com/watch?v=OHcfs6rStRo&feature=youtu.be
New Optimizations
ConstraintLayout안의 불필요한 제약조건들을 줄여서, 레이아웃 속도를 빠르게 해주는 최적화 레벨을 지정할 수 있다.
layout_optimizationLevel 속성에 레벨을 지정하여 최적화 레벨을 지정한다. 최적화레벨은 다음의 5가지가 존재한다.- barriers : Barrier 제약조건에 관련하여 최적화
- direct : 고정된 요소(예 : parent, Guideline)에 연결된 제약조건에 관련하여 최적화
- standard : barriers, direct를 포함한 기본 최적화 레벨
- dimensions : 뷰 크기에 관련된 부분을 최적화 - 해당 옵션은 현재 테스트중이며 이슈 발생의 소지가 있다.
- chains : 고정된 크기의 뷰를 체이닝할때의 최적화 - 해당 옵션은 현재 테스트중이며 이슈 발생의ㅏ 소지가 있다.
<android.support.constraint.ConstraintLayout
    app:layout_optimizationLevel="standard|dimensions|chains"
참고링크
- http://dktfrmaster.blogspot.kr/2016/09/constraintlayout.html
- https://developer.android.com/reference/androidx/constraintlayout/widget/ConstraintLayout


