레이블이 레이아웃인 게시물을 표시합니다. 모든 게시물 표시

2018년 5월 18일 금요일

[안드로이드] ConstraintLayout 1.1 새로운 기능 소개

ConstraintLayout 1.1 새로운 기능 소개

Percents

1.0에서는 뷰의 크기를 퍼센트로 지정하려면 가이드라인 2개를 이용하거나, ConstraintLayout 대신 PecentLayout을 이용해야만 가능했다. 1.1에서 추가된 속성을 이용하면 뷰의 크기를 쉽게 퍼센트로 지정할 수 있다.
퍼센트를 사용하려면 다음의 사항을 따라야 한다.
  • layout_width / layout_height를 0dp(MATCH_CONSTRAINT) 로 해야한다.
  • layout_constraintWidth_percent / layout_constraintHeight_percent를 이용한다.
    • 해당 속성의 값은 0 ~ 1 사이의 값이여야 한다.
<Button
    android:layout_width="0dp"
    android:layout_height="0dp"
    app:layout_constraintWidth_percent="0.7"
    app:layout_constraintHeight_percent="0.2" />

Chains

Chain 제약은 여러개의 뷰를 묶어 어떻게 공간에 배치할지를 정하는 조건이다.
Chain으로 묶으려면, 쌍방에 대한 제약조건을 걸면 된다. 수평 / 수직 방향 모두 가능하며, 배치 방법에는 다음의 3가지가 있다.
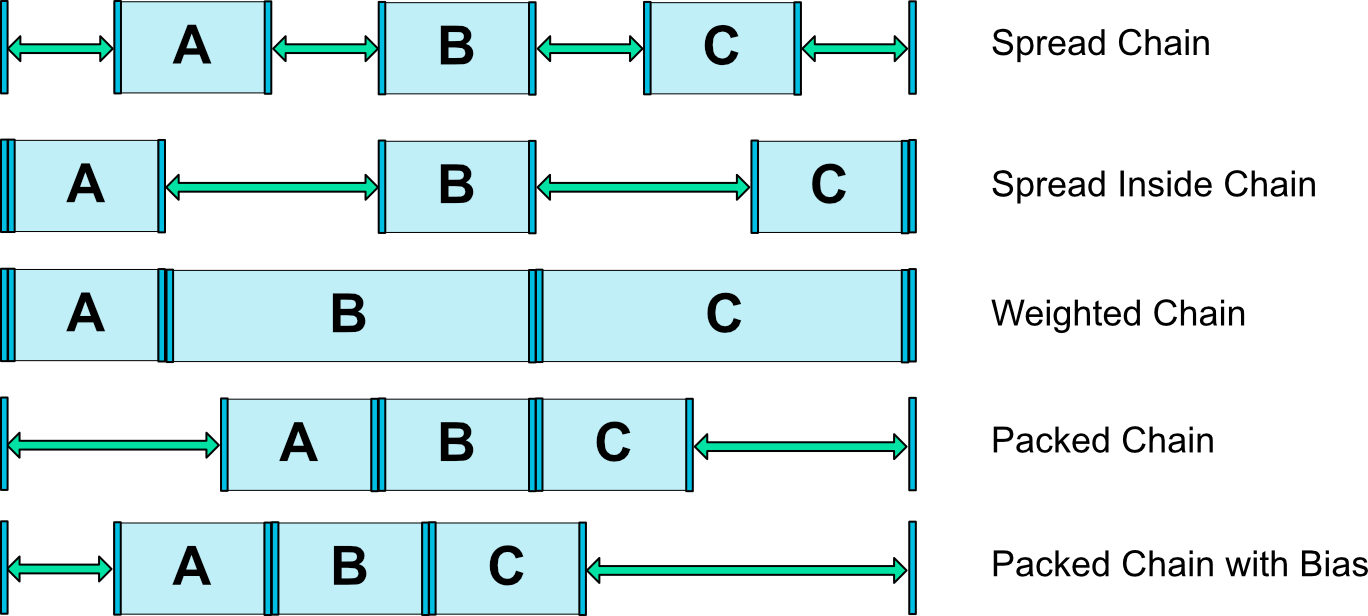

  • speard : 기본적인 배치이다. layout_constraintVertical_weight / layout_constraintHorizontal_weight 을 이용하면 LinearLayout의 layout_weight효과를 낼 수 있다.
  • spread_inside : 공간의 가장자리에 첫번째 부와 마지막 뷰가 배치되고, 남은 사이공간에 나머지 뷰들이 배치된다.
  • packed : 묶인 모든 뷰들이 공간의 가운데에 배치된다. bias 속성과 함꼐 사용하면 위치를 조절할 수 있다.

Barriers

Barrier 라는 헬퍼 객체를 이용하여, 뷰들의 크기가 런타임으로 변할때에 적합한 제약조건을 생성할 수 있다.(객체라기보다는 가상의 그룹에 가깝다.) 해당 Barrier에 연관된 뷰들은 크기가 동적으로 변할 수 있고, 크기가 동적으로 변할 때, Barrier에 제약조건을 건 뷰들은 크기 / 위치가 Barrier에 맞게 변경된다. Barrier는 start, top, end, bottom중 하나의 위치로 지정될 수 있다. 해당 객체는 ConstraintLayout에 계층구조로 잡히지 않으며 렌더링되지 않는다.
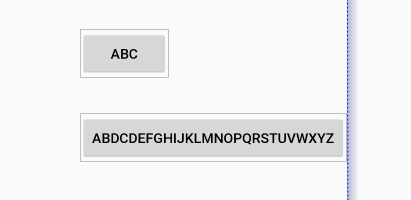
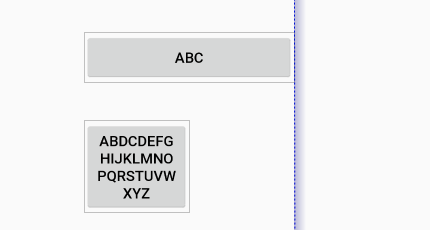


<android.support.constraint.ConstraintLayout 
  xmlns:android="http://schemas.android.com/apk/res/android"
  xmlns:app="http://schemas.android.com/apk/res-auto"
  android:layout_width="match_parent"
  android:layout_height="match_parent">

  <TextView
    android:id="@+id/textView1"
    android:layout_width="wrap_content"
    android:layout_height="wrap_content"
    android:layout_marginStart="16dp"
    android:layout_marginTop="16dp"
    android:text="@string/warehouse"
    app:layout_constraintStart_toStartOf="parent"
    app:layout_constraintTop_toTopOf="parent" />

  <TextView
    android:id="@+id/textView2"
    android:layout_width="wrap_content"
    android:layout_height="wrap_content"
    android:layout_marginStart="16dp"
    android:layout_marginTop="8dp"
    android:text="@string/hospital"
    app:layout_constraintStart_toStartOf="parent"
    app:layout_constraintTop_toBottomOf="@+id/textView1" />

  <android.support.constraint.Barrier
    android:id="@+id/barrier7"
    android:layout_width="wrap_content"
    android:layout_height="wrap_content"
    app:barrierDirection="end"
    app:constraint_referenced_ids="textView2,textView1" />

  <TextView
    android:id="@+id/textView3"
    android:layout_width="0dp"
    android:layout_height="wrap_content"
    android:layout_marginStart="8dp"
    android:text="@string/lorem_ipsum"
    app:layout_constraintStart_toEndOf="@+id/barrier7"
    app:layout_constraintTop_toTopOf="parent" />

</android.support.constraint.ConstraintLayout>

Group

Group이라는 헬퍼 객체를 이용해, 몇몇 뷰들을 그룹화 할 수 있다. 그룹화 함으로써 얻는 장점은, visibility 등의 동시적인 작업이 필요할때, 해당 그룹을 이용하여 작업을 수행하면 그룹안의 뷰들에게 전체적으로 적용된다. 해당 객체는 ConstraintLayout에 계층구조로 잡히지 않으며 렌더링되지 않는다.
<android.support.constraint.Group
    android:id="@+id/profile"
    app:constraint_referenced_ids="profile_name,profile_image" />
profile.setVisibility(View.VISIBLE);

Circular Constraints

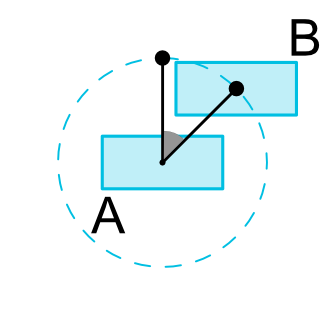
기존의 대부분 레이아웃이 수평 / 수직의 배치만 지원한 것에 비해, 원형의 배치를 지원하게 되었다. 원형 배치를 구현하려면 다음을 수행한다.
  • layout_constraintCircle속성에 구심점이 될 뷰를 지정한다.
  • layout_constraintCircleRadius속성에 구심점으로부터의 거리를 지정한다.(반지름)
  • layout_constraintCircleAngle속성에 0 ~ 360 사이의 각도값을 지정한다. 12시 방향이 0도이고, 시계방향으로 각도가 늘어난다.
<android.support.design.widget.FloatingActionButton
    android:id="@+id/middle_expanded_fab"
    app:layout_constraintCircle="@+id/fab"
    app:layout_constraintCircleRadius="50dp"
    app:layout_constraintCircleAngle="315" />
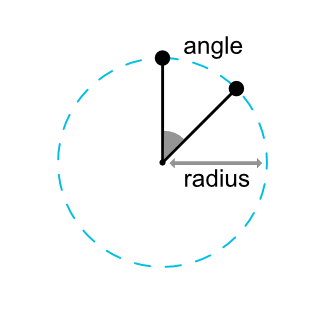


ConstraintSet을 이용한 애니메이션

ConstraintSet을 이용하면 여러개의 뷰들을 한번에 애니메이셔닝 할 수 있다. ConstraintSet은 ConstraintLayout에서의 제약조건들만 가지고 있고, 해당 제약조건들을 ConstraintLayout에 지정함으로써 제약조건들을 갱신할 수 있다.
애니메이션을 수행하려면, TransitionManager.beginDelayedTransition() API를 이용한다. 이 메서드는 ConstraintSet의 모든 레이아웃의 변경사항을 애니메이션으로 수행한다.
해당 기능에 대해 설명한 비디오
https://www.youtube.com/watch?v=OHcfs6rStRo&feature=youtu.be

New Optimizations

ConstraintLayout안의 불필요한 제약조건들을 줄여서, 레이아웃 속도를 빠르게 해주는 최적화 레벨을 지정할 수 있다. layout_optimizationLevel 속성에 레벨을 지정하여 최적화 레벨을 지정한다. 최적화레벨은 다음의 5가지가 존재한다.
  • barriers : Barrier 제약조건에 관련하여 최적화
  • direct : 고정된 요소(예 : parent, Guideline)에 연결된 제약조건에 관련하여 최적화
  • standard : barriers, direct를 포함한 기본 최적화 레벨
  • dimensions : 뷰 크기에 관련된 부분을 최적화 - 해당 옵션은 현재 테스트중이며 이슈 발생의 소지가 있다.
  • chains : 고정된 크기의 뷰를 체이닝할때의 최적화 - 해당 옵션은 현재 테스트중이며 이슈 발생의ㅏ 소지가 있다.
<android.support.constraint.ConstraintLayout 
    app:layout_optimizationLevel="standard|dimensions|chains"

참고링크

  • http://dktfrmaster.blogspot.kr/2016/09/constraintlayout.html
  • https://developer.android.com/reference/androidx/constraintlayout/widget/ConstraintLayout

2018년 3월 15일 목요일

[안드로이드] CoordinatorLayout 기본 동작 원리

CoordinatorLayout

개요

CoordinatorLayout은 매우 강력한 기능을 가진 FrameLayout 이다. 이 레이아웃은 다음의 2가지 기본사용 사례를 위해 만들어졌다.
  1. 애플리케이션에서 최상위의 decor View로써 사용
  2. 자식 뷰들간의 특정한 인터렉션을 지원하는 컨테이너로써 사용
CoordinatorLayout의 자식뷰에 Behavior를 지정하는 방식으로, 하나의 부모 안에서 여러 다른 인터렉션을 지원할 수 있고, 자식뷰들간에도 서로 인터렉션 할 수 있다. Behavior 는 슬라이딩 드로어나 스와이프 해제액션 등 뷰의 다양한 움직임이나 애니메이션에 따른 상호작용을 구현하기 위해 사용된다.
CoordinatorLayout의 자식들은 anchor를 가질 것이다. 이 anchor는 일반적으로 다른 뷰를 가리키며, 뷰의 id 값으로 표시된다. anchor는 반드시 CoordinatorLayout 하위의 자손 뷰중 하나의 아이디여야 하지만, 고정된 자손뷰가 아닐 수도 있다. 이는 다른 임의의 화면의 상대위치에 뷰를 띄우는 용도로 사용될 수도 있다.
insetEdge속성을 이용해 CoordinatorLayout 안에 자식뷰들이 어떻게 배치될지 지정할 수 있다. 만약 자식뷰가 겹칠 것을 대비해, dodgeInsetEdges속성을 주어 적절하게 뷰가 겹치지 않도록 배치할 수 있다.

Behavior

CoordinatorLayout 구현의 가장 핵심 개념이다. 자식뷰에 Behavior가 지정되어 있으면, CoordinatorLayout은 그것을 토대로 부모뷰 - 자식뷰 / 자식뷰 - 자식뷰 의 소통을 구현한다. CoordinatorLayout에서 자식뷰와 소통해야 하는 부분(인터렉션, 뷰 배치 등)에서 Behavior를 사용하는 코드를 확인할 수 있다. 아래의 예제와 같이 곳곳에서 Behavior를 사용하고 있다.
public class CoordinatorLayout extends ViewGroup implements NestedScrollingParent {
    ...
    // Behavior가 인터렉션에 활용되는 예시
    @Override
    public boolean onInterceptTouchEvent(MotionEvent ev) {
        ...
        final boolean intercepted = performIntercept(ev, TYPE_ON_INTERCEPT);
        ...
        return intercepted;
    }
    
    private boolean performIntercept(MotionEvent ev, final int type) {
        boolean intercepted = false;
        boolean newBlock = false;

        MotionEvent cancelEvent = null;

        final int action = MotionEventCompat.getActionMasked(ev);

        final List<View> topmostChildList = mTempList1;
        getTopSortedChildren(topmostChildList);

        // Let topmost child views inspect first
        final int childCount = topmostChildList.size();
        for (int i = 0; i < childCount; i++) {
            final View child = topmostChildList.get(i);
            final LayoutParams lp = (LayoutParams) child.getLayoutParams();
            final Behavior b = lp.getBehavior();

            if ((intercepted || newBlock) && action != MotionEvent.ACTION_DOWN) {
                // Cancel all behaviors beneath the one that intercepted.
                // If the event is "down" then we don't have anything to cancel yet.
                if (b != null) {
                    if (cancelEvent == null) {
                        final long now = SystemClock.uptimeMillis();
                        cancelEvent = MotionEvent.obtain(now, now,
                                MotionEvent.ACTION_CANCEL, 0.0f, 0.0f, 0);
                    }
                    switch (type) {
                        case TYPE_ON_INTERCEPT:
                            b.onInterceptTouchEvent(this, child, cancelEvent);
                            break;
                        case TYPE_ON_TOUCH:
                            b.onTouchEvent(this, child, cancelEvent);
                            break;
                    }
                }
                continue;
            }

            ...
        }
        topmostChildList.clear();
        return intercepted;
    }

    @Override
    public boolean onTouchEvent(MotionEvent ev) {
        boolean handled = false;
        boolean cancelSuper = false;
        MotionEvent cancelEvent = null;

        final int action = MotionEventCompat.getActionMasked(ev);

        if (mBehaviorTouchView != null || (cancelSuper = performIntercept(ev, TYPE_ON_TOUCH))) {
            // Safe since performIntercept guarantees that
            // mBehaviorTouchView != null if it returns true
            final LayoutParams lp = (LayoutParams) mBehaviorTouchView.getLayoutParams();
            final Behavior b = lp.getBehavior();
            if (b != null) {
                handled = b.onTouchEvent(this, mBehaviorTouchView, ev);
            }
        }

        ...
        return handled;
    }
    
    ...
    
    // Behavior가 뷰의 배치에 활용되는 예시
    @Override
    protected void onMeasure(int widthMeasureSpec, int heightMeasureSpec) {
        ...
        
        final int childCount = mDependencySortedChildren.size();
        for (int i = 0; i < childCount; i++) {
            final View child = mDependencySortedChildren.get(i);
            if (child.getVisibility() == GONE) {
                // If the child is GONE, skip...
                continue;
            }

            final LayoutParams lp = (LayoutParams) child.getLayoutParams();
            
            ...
            
            final Behavior b = lp.getBehavior();
            if (b == null || !b.onMeasureChild(this, child, childWidthMeasureSpec, keylineWidthUsed,
                    childHeightMeasureSpec, 0)) {
                onMeasureChild(child, childWidthMeasureSpec, keylineWidthUsed,
                        childHeightMeasureSpec, 0);
            }

            widthUsed = Math.max(widthUsed, widthPadding + child.getMeasuredWidth() +
                    lp.leftMargin + lp.rightMargin);

            heightUsed = Math.max(heightUsed, heightPadding + child.getMeasuredHeight() +
                    lp.topMargin + lp.bottomMargin);
            childState = ViewCompat.combineMeasuredStates(childState,
                    ViewCompat.getMeasuredState(child));
        }

        ...

        setMeasuredDimension(width, height);
    }
    
    @Override
    protected void onLayout(boolean changed, int l, int t, int r, int b) {
        final int layoutDirection = ViewCompat.getLayoutDirection(this);
        final int childCount = mDependencySortedChildren.size();
        for (int i = 0; i < childCount; i++) {
            final View child = mDependencySortedChildren.get(i);
            if (child.getVisibility() == GONE) {
                // If the child is GONE, skip...
                continue;
            }

            final LayoutParams lp = (LayoutParams) child.getLayoutParams();
            final Behavior behavior = lp.getBehavior();

            if (behavior == null || !behavior.onLayoutChild(this, child, layoutDirection)) {
                onLayoutChild(child, layoutDirection);
            }
        }
    }
}

기본적으로 제공되는 Behavior

  • CoordinatorLayout.Behavior
    • BottomSheetBehavior : Bottom Sheet처럼 동작하도록 지원하는 Behavior
    • FloatActionButton.Behavior
    • SwipeDismissBehavior : swipe-to-dismiss제스쳐를 지원하는 Behavior
      • BaseTransientBottomBar.Behavior
    • ViewOffsetBehavior : 뷰들의 offset을 지정
      • HeaderScrollingViewBehavior : 수직으로 된 레이아웃에서 다른 뷰 아래에 있으면서 스크롤되는 뷰를 위한 Behavior
        • AppBarLayout.ScrollingViewBehavior
      • HeaderBehavior : 수직으로 스크롤되는 뷰 위에 놓이는 뷰를 위한 Behavior
        • AppBarLayout.Behavior

기본 Behavior 동작영상

Anchor

Anchor는 자식뷰들간의 연관성을 표현하는 개념이다. CoordinatorLayout 안에서 어떤 자식뷰의 배치나 인터렉션이 있을 때, 연관된(Anchor로 등록된) 자식뷰들에게 상태변화를 알려주도록 구현하기 위해 사용된다. 연관성을 표현하기 위해 내부적으로 그래프를 이용한다. 아래의 예제는 CoordinatorLayout 안에서의 Anchor개념을 사용하는 코드이다.
public class CoordinatorLayout extends ViewGroup implements NestedScrollingParent {
    ...
    private final DirectedAcyclicGraph<View> mChildDag = new DirectedAcyclicGraph<>();
    ...
    
    // onMeasure()에서 anchor 그래프 준비
    @Override
    protected void onMeasure(int widthMeasureSpec, int heightMeasureSpec) {
        prepareChildren();
        ...
    }

    private void prepareChildren() {
        mDependencySortedChildren.clear();
        mChildDag.clear();

        for (int i = 0, count = getChildCount(); i < count; i++) {
            final View view = getChildAt(i);

            final LayoutParams lp = getResolvedLayoutParams(view);
            lp.findAnchorView(this, view);

            mChildDag.addNode(view);

            // Now iterate again over the other children, adding any dependencies to the graph
            for (int j = 0; j < count; j++) {
                if (j == i) {
                    continue;
                }
                final View other = getChildAt(j);
                final LayoutParams otherLp = getResolvedLayoutParams(other);
                if (otherLp.dependsOn(this, other, view)) {
                    if (!mChildDag.contains(other)) {
                        // Make sure that the other node is added
                        mChildDag.addNode(other);
                    }
                    // Now add the dependency to the graph
                    mChildDag.addEdge(view, other);
                }
            }
        }

        // Finally add the sorted graph list to our list
        mDependencySortedChildren.addAll(mChildDag.getSortedList());
        // We also need to reverse the result since we want the start of the list to contain
        // Views which have no dependencies, then dependent views after that
        Collections.reverse(mDependencySortedChildren);
    }

    ...

    // 연관된 View들에게 상태변화를 알려줌
    public void dispatchDependentViewsChanged(View view) {
        final List<View> dependents = mChildDag.getIncomingEdges(view);
        if (dependents != null && !dependents.isEmpty()) {
            for (int i = 0; i < dependents.size(); i++) {
                final View child = dependents.get(i);
                CoordinatorLayout.LayoutParams lp = (CoordinatorLayout.LayoutParams)
                        child.getLayoutParams();
                CoordinatorLayout.Behavior b = lp.getBehavior();
                if (b != null) {
                    b.onDependentViewChanged(this, child, view);
                }
            }
        }
    }
    
    ...
}

LayoutParams

CoordinatorLayout은 다른 몇몇 레이아웃처럼, 자신에게 특화된 LayoutParams 정적 클래스를 가지고 있다. LayoutParams 클래스는 Behavior와 anchor 정보를 가지고 있어서, 부모가 요청할 때마다 그 정보를 넘겨주도록 구현되어 있다. 다음의 코드는 CoordinatorLayout.LayoutParams의 코드 일부분이다.
public static class LayoutParams extends ViewGroup.MarginLayoutParams {
    Behavior mBehavior;
    public int anchorGravity = Gravity.NO_GRAVITY;
    int mAnchorId = View.NO_ID;
    View mAnchorView;
    View mAnchorDirectChild;
    ...
    
    @Nullable
    public Behavior getBehavior() {
        return mBehavior;
    }
        
     public void setBehavior(@Nullable Behavior behavior) {
        if (mBehavior != behavior) {
            if (mBehavior != null) {
                // First detach any old behavior
                mBehavior.onDetachedFromLayoutParams();
            }

            mBehavior = behavior;
            mBehaviorTag = null;
            mBehaviorResolved = true;

            if (behavior != null) {
                // Now dispatch that the Behavior has been attached
                behavior.onAttachedToLayoutParams(this);
            }
        }
    }
    
    @IdRes
    public int getAnchorId() {
        return mAnchorId;
    }

    public void setAnchorId(@IdRes int id) {
        invalidateAnchor();
        mAnchorId = id;
    }

    View findAnchorView(CoordinatorLayout parent, View forChild) {
        if (mAnchorId == View.NO_ID) {
            mAnchorView = mAnchorDirectChild = null;
            return null;
        }

        if (mAnchorView == null || !verifyAnchorView(forChild, parent)) {
            resolveAnchorView(forChild, parent);
        }
        return mAnchorView;
    }
    ...
}

CoordinatorLayout 기본 사용법

  1. 모듈레벨의 build.gradle 에 다음을 추가한다.
...
dependencies {
    ...
    compile 'com.android.support:appcompat-v7:25.1.1'
    compile 'com.android.support:design:25.1.1'
    ...
}
...
  1. CoordinatorLayout을 지정할 레이아웃 xml의 루트 레이아웃으로 지정한다.
  2. CoordinatorLayout의 자식중 behavior를 지정할 자식에게 app:layout_behavior속성을 지정해 준다. 해당 속성은 String 타입으로, 지정할 Behavior의 패키지를 포함한 클래스명을 넣어야 한다.
<!-- activity_main.xml -->
<?xml version="1.0" encoding="utf-8"?>
<android.support.design.widget.CoordinatorLayout xmlns:android="http://schemas.android.com/apk/res/android"
    xmlns:app="http://schemas.android.com/apk/res-auto"
    xmlns:tools="http://schemas.android.com/tools"
    android:layout_width="match_parent"
    android:layout_height="match_parent"
    android:fitsSystemWindows="true">

    <android.support.design.widget.AppBarLayout
        android:id="@+id/app_bar"
        android:layout_width="match_parent"
        android:layout_height="@dimen/app_bar_height"
        android:fitsSystemWindows="true"
        android:theme="@style/AppTheme.AppBarOverlay">

        <android.support.design.widget.CollapsingToolbarLayout
            android:id="@+id/toolbar_layout"
            android:layout_width="match_parent"
            android:layout_height="match_parent"
            android:fitsSystemWindows="true"
            app:contentScrim="?attr/colorPrimary"
            app:layout_scrollFlags="scroll|exitUntilCollapsed">

            <android.support.v7.widget.Toolbar
                android:id="@+id/toolbar"
                android:layout_width="match_parent"
                android:layout_height="?attr/actionBarSize"
                app:layout_collapseMode="pin"
                app:popupTheme="@style/AppTheme.PopupOverlay" />

        </android.support.design.widget.CollapsingToolbarLayout>
    </android.support.design.widget.AppBarLayout>

    <android.support.v4.widget.NestedScrollView
        android:layout_width="match_parent"
        android:layout_height="match_parent"
        app:layout_behavior="@string/appbar_scrolling_view_behavior"
        tools:showIn="@layout/activity_scrolling">

        <TextView
            android:layout_width="wrap_content"
            android:layout_height="wrap_content"
            android:layout_margin="@dimen/text_margin"
            android:text="@string/large_text" />

    </android.support.v4.widget.NestedScrollView>

    <android.support.design.widget.FloatingActionButton
        android:id="@+id/fab"
        android:layout_width="wrap_content"
        android:layout_height="wrap_content"
        android:layout_margin="@dimen/fab_margin"
        app:layout_anchor="@id/app_bar"
        app:layout_anchorGravity="bottom|end"
        app:srcCompat="@android:drawable/ic_dialog_email" />

</android.support.design.widget.CoordinatorLayout>

<!-- strings.xml -->
<resources>
    <string name="appbar_scrolling_view_behavior" translatable="false">android.support.design.widget.AppBarLayout$ScrollingViewBehavior</string>
</resources>