1.1 업데이트 내용
* http://dktfrmaster.blogspot.kr/2018/05/constraintlayout-11.html
ConstraintLayout
ConstraintLayout은 위젯(뷰)의 위치, 크기를 유연한 방법으로 배치하도록 하는 ViewGroup의 서브클래스이다. 현재로써는, 다음과 같은 제약조건을 이용할 수 있다.
- Relative Positioning
- Margins
- Centering Positioning
- Visibility Behavior
- Dimension Constraint
- Virtual Helpers Objects
참고로, 제약조건은 순환관계를 가질 수 없다.
Note : 이 레이아웃은 Support 라이브러리로 지원되며,
API 9(진저브레드) 이상부터 이용할 수 있다. 안드로이드 팀은 이 레이아웃에 더 많은 기능을 추가할 예정이며, 바뀐 내용은 이 문서에 반영될 것이다.개발 가이드
Relative Positioning (기존의 RelativeLayout과 유사)
Relative Positioning은 ConstraintLayout에서의 기본적인 레이아웃 배치 중 하나이다. 이 제약조건은 어떤 위젯을 다른 위젯에 상대적으로 배치할 수 있도록 한다. 이 제약조건은 위젯의 수직,수평을 기준으로 추가한다.
- 수직 : Left, Right, Start, End
- 수평 : Top, Bottom
즉, 이 개념은 위젯의 한 사이드를 다른 위젯의 사이드에 상대적으로 배치하는 것이다.
다음 예시는 버튼 B를 버튼 A의 오른쪽에 배치하는 과정이다.


<Button android:id="@+id/buttonA" ... />
<Button android:id="@+id/buttonB" ...
         app:layout_constraintLeft_toRightOf="@+id/buttonA" />
이는 버튼 B의 왼쪽 사이드를 버튼 A의 오른쪽 사이드에 배치되도록 제약조건을 시스템에 알려주는 것이다.
위치 제약조건은 시스템이 각 위젯의 사이드를 같은 위치가 되도록 배치할 것이다.

위치 제약조건은 시스템이 각 위젯의 사이드를 같은 위치가 되도록 배치할 것이다.

다음과 같은 위치 제약조건이 가능하다.
- layout_constraintLeft_toLeftOf
- layout_constraintLeft_toRightOf
- layout_constraintRight_toLeftOf
- layout_constraintRight_toRightOf
- layout_constraintTop_toTopOf
- layout_constraintTop_toBottomOf
- layout_constraintBottom_toTopOf
- layout_constraintBottom_toBottomOf
- layout_constraintBaseline_toBaselineOf
- layout_constraintStart_toEndOf
- layout_constraintStart_toStartOf
- layout_constraintEnd_toStartOf
- layout_constraintEnd_toEndOf
위의 제약조건들은
기준이 될 위젯의 id가 필요하다. 혹은 부모를 의미하는 parent를 입력한다.<Button android:id="@+id/buttonB" ...
app:layout_constraintLeft_toLeftOf="parent" />Margins

마진이 설정되면, 해당 뷰와 타겟 뷰 사이에 강제적으로 여백이 생기고, 이에 해당하는 제약조건이 생길 것이다. 기존에 사용했던 마진을 주는 방법으로 제약조건을 추가할 수 있다.
- android:layout_marginStart
- android:layout_marginEnd
- android:layout_marginLeft
- android:layout_marginTop
- android:layout_marginRight
- android:layout_marginBottom
Gone 상태의 위젯에 연결되었을때의 Margin
- 위치 제약조건의 대상이 View.GONE 상태일 때, 기존의 마진과는 다른 마진값을 적용할 수 있다. 이 값을 적용하려면 다음의 속성들을 이용한다.
- layout_goneMarginStart
- layout_goneMarginEnd
- layout_goneMarginLeft
- layout_goneMarginTop
- layout_goneMarginRight
- layout_goneMarginBottom
Centering positioning and bias
ConstraintLayout은
불가능한 제약조건을 잘 처리할 수 있기 때문에 유용하다. 예를 들어, 다음과 같은 상황이 있을 수 있다.<android.support.constraint.ConstraintLayout ...>
<Button android:id="@+id/button" ...
app:layout_constraintLeft_toLeftOf="parent"
app:layout_constraintRight_toRightOf="parent/>
</>
이 상황에서, ConstraintLayout이 버튼과 동일한 수평사이즈가 아니라면, 두 제약조건은 동시에 만족하지 않는다.(버튼의 양 사이드는 우리가 의도한 곳에 놓이지 않는다) 이런 경우에, 제약조건은 다음 그림과 같이 버튼을 양쪽 끝에서 같은 힘으로 당기는 것처럼 동작한다. 결과적으로, 버튼은 부모 컨테이너의 중앙에 놓이게 된다. 이는 수직의 제약조건에서도 유사하게 적용된다.

Bias
위에서 살펴본 바와 같이, 기본적으로 상반되는 두 제약조건의 결과는 위젯을 중앙에 배치시킨다. 하지만,
bias라는 속성을 이용해 어느 한쪽에 더 가깝도록 위젯을 배치할 수 있다. 그 속성은 다음과 같다.- layout_constraintHorizontal_bias
- layout_constraintVertical_bias
다음의 예제는 A 위젯을 기존의 50% 중앙 위치 대신, 30%인 왼쪽으로 기울도록 배치할 것이다.
<android.support.constraint.ConstraintLayout ...>
             <Button android:id="@+id/button" ...
                 app:layout_constraintHorizontal_bias="0.3"
                 app:layout_constraintLeft_toLeftOf="parent"
                 app:layout_constraintRight_toRightOf="parent/>
         </>
이처럼, bias를 잘 사용하면 UI를 스크린 크기의 변화에 더 잘 배치되도록 UI를 변경할 수 있다.
Visibility Behavior
ConstraintLayout은 위젯이 View.GONE 상태일때를 특별하게 다룰 수 있다. 일반적으로,
GONE 위젯은 화면에 보여지지 않고, 레이아웃의 일부가 아니다.(즉, 실제 Dimension이 변하지 않는다.) 그러나, 레이아웃의 제약조건 관점에서, GONE 위젯은 여전히 레이아웃의 일부이다.(이는 중요한 특징이 있다.)GONE위젯의 크기는 0으로 처리된다.- 다른 위젯이
GONE위젯에 제약조건을 걸었을 때, 그 제약조건은 여전히 유효하지만,GONE된 위젯의 마진은 0으로 처리된다.

Note : 위의 그림처럼 B가 A에 제약조건을 걸고 마진값을 가지고 있는 상태에서, A가 GONE이 되면 A의 마진값도 0이 되고, 그림처럼 B는 자신이 A에 걸었던 마진값만 남게 된다. 제약조건을 걸었던 위젯의 GONE 여부에 따라 대체하는 마진값을 주기 위해, 위에서 소개했던
Gone margin값을 이용한다.Dimensions 제약조건
android:layout_width, android:layout_height 속성을 이용해서, 다음의 3가지 방법으로 위젯의 크기를 지정할 수 있다.- 특정 크기(
123dp,@dimen/height) wrap_content위젯 자신이 크기를 결정0dp-match_constraint와 동일

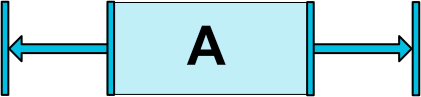
처음의 두 방법은 다른 레이아웃과 동일하게 동작한다. 마지막 방법은 위젯이 제약조건에 맞춰서 리사이징 될 것이다. 위의 그림에서, (a)는
wrap_content, (b)는 0dp, (c)는 마진값이 있을 때의 0dp 이다.Ratio
위젯 크기는
수평:수직의 비율로도 정할 수 있다. 비율로 크기를 정하려면, width/height를 0dp(or match_constraint)로 지정하고 layout_constraintDimensionRatio 속성을 이용해 수평:수직 비율값을 준다. 다음의 예시는 수평:수직 비율을 1:1로 준 것이다.<Button android:layout_width="wrap_content"
android:layout_height="0dp"
app:layout_constraintDimensionRatio="1:1" />
비율은 다음과 같이 2가지 방법으로 표현될 수 있다.
- width와 height의 비율을 나타내는 소수값
width : height비율
수평과 수직이 모두
match_constraint(0dp) 일 때도 비율로 나타낼 수 있다. 단, 이 때는 layout_constraintDimensionRatio 속성에 W or H를 명시하여 변경될 사이드를 지정해 주어야 한다. ( W는 수평, H는 수직) 사이드 구분자는 , 쉼표로 비율과 구분한다.<Button android:layout_width="0dp"
android:layout_height="0dp"
app:layout_constraintDimensionRatio="H,16:9"
app:layout_constraintBottom_toBottomOf="parent"
app:layout_constraintTop_toTopOf="parent"/>
다음의 예제는 버튼의 width가 제약조건에 맞게 늘어나고, height는 16:9 비율로 리사이즈 될 것이다.
Vertual Helper Object
지금까지 설명된 위의 내용 이외에도,
ConstraintLayout에서 레이아웃을 쉽게 배치할 수 있도록 하는 헬퍼 클래스가 있다. Guideline 클래스는 ConstraintLayout 내에 상대적으로 배치됬을 때, 수평 or 수직적인 가이드 라인을 생성해준다. 개발자는 그 가이드라인의 제약조건대로 위젯을 배치하면 된다.Guideline
ConstraintLayout의 제약조건을 쉽게 설정하도록 도와주는 헬퍼클래스로, 이 객체는 화면에 나타나지 않고,(이 객체들은 View.GONE 상태이다.) 오로지 레이아웃을 위해 사용된다. 이 객체들은 ConstraintLayout 안에서만 사용된다.
Guideline 객체는 수평, 수직이 될 수 있다.- 수직 Guideline은 width가 0이고, height는 ConstraintLayout과 같다.
- 수평 Guideline은 height가 0이고, width는 ConstraintLayout과 같다.
Guideline 객체의 위치는 다음의 3가지가 가능하다.
- Left(수평일 경우) or Top(수직일 경우) 로부터 고정된 거리 -
layout_constraintGuide_begin - Right(수평일 경우) or Bottom(수직일 경우) 로부터 고정된 거리 -
layout_constraintGuide_end - ConstraintLayout의 width or height에 대한 퍼센트 위치 -
layout_constraintGuide_percent
Guideline 객체를 이용하여 다른 위젯을 쉽게 배치할 수 있고, 위젯이 Guideline 객체에 제약조건을 추가할 수 있다. xml에서는 다음의 예시와 같이 사용할 수 있다.<android.support.constraint.ConstraintLayout
xmlns:android="http://schemas.android.com/apk/res/android"
xmlns:app="http://schemas.android.com/apk/res-auto"
xmlns:tools="http://schemas.android.com/tools"
android:layout_width="match_parent"
android:layout_height="match_parent">
<android.support.constraint.Guideline
android:layout_width="wrap_content"
android:layout_height="wrap_content"
android:id="@+id/guideline"
app:layout_constraintGuide_begin="100dp"
android:orientation="vertical"/>
<Button
android:text="Button"
android:layout_width="wrap_content"
android:layout_height="wrap_content"
android:id="@+id/button"
app:layout_constraintLeft_toLeftOf="@+id/guideline"
android:layout_marginTop="16dp"
app:layout_constraintTop_toTopOf="parent" />
</android.support.constraint.ConstraintLayout>ConstraintSet
위에 소개된 방법들은, 모두 xml에서의 적용방법이다.
ConstraintSet 클래스의 객체를 이용하면 제약조건을 소스코드에서 변경할 수 있다. 이 클래스는 몇가지의 생성 방법이 있다.- Manually
ConstraintSet c = new ConstraintSet();
c.connect(...);- R.layout.* 로부터
ConstraintSet c = c.clone(context, R.layout.some_layout);- ConstraintLayout 으로부터
c.clone(cLayout);
좋은 정보 감사합니다!
답글삭제좋은 정보감사합니다!! 이제 좀 Constraint Layout을 어떻게 써야되는지 좀 이해가 되는 거 같습니다.!
답글삭제정리가 너무 잘 되어 있어요. 정말 많은 도움 받고 갑니다. 수고해 주셔서 감사합니다.
답글삭제마지막에 ConstraintSet 의 clone이 static함수가 아닌데 null상태인 c를 참조해서 호출이 가능한가요?
답글삭제