원문
내용
제가 3년간 구글에서 일하면서, 가장 멋진 프로젝트중에 하나는 전세계를 표현한 가상의 공간에서 교사가 학생들을 이끄는 것을 가능하게 했던 Google Expeditions 라는 앱이었습니다. 특히, 카드 기반의 레이아웃으로 디자인된 SurfaceView를 렌더링 하는 작업이 즐거웠습니다.
예전에 안드로이드 코드를 작성한 이후로는, 잠시동안 안드로이드 개발툴을 구축하는데 시간을 쏟았습니다. 그래서 다시 그 화면의 예제를 작성해 보았습니다. 아래의 동영상(Figure 1)은 Google Expeditions 앱과 제가 작성한 샘플 앱을 비교한 것입니다.
Figure 1 : https://www.androiddesignpatterns.com/assets/videos/posts/2018/01/24/expeditions-sample-opt.mp4
코드를 작성하면서, 2년전에도 직면했었던 안드로이드의 Nested Scrolling API을 사용하며 겪었던 어려움들을 떠올렸습니다. API level 21(Lollipop) 에서 소개된 이 개념은 머티리얼 디자인에서 소개된 스크롤 패턴을 구현할 수 있도록, 스크롤 가능한 부모뷰가 스크롤 가능한 자식뷰를 포함할 수 있게 해주는 것이 가장 큰 특징입니다.
Figure 2 동영상은 부모인
CoordinatorLayout과 자식인 NestedScrollView로 구현한 이 API의 흔한 사용예시를 보여주고 있습니다. Nested Scrolling 개념을 사용하지 않는다면, NestedScrollView는 부모와는 독립적으로 스크롤 동작이 될 것입니다. 반면에, Nested Scrolling 개념을 사용하면, CoordinatorLayout과 NestedScrollView가 차례대로 스크롤 이벤트를 가로채서 소비하므로, Figure 2의 오른쪽과 같이 자연스러운 Collapsing Toolbar 효과를 만들 수 있습니다.
Figure 2 : https://www.androiddesignpatterns.com/assets/videos/posts/2018/01/24/cheesesquare-opt.mp4
그러면 Nested Scrolling API들은 정확하게 어떻게 동작할까요? 가장 먼저,
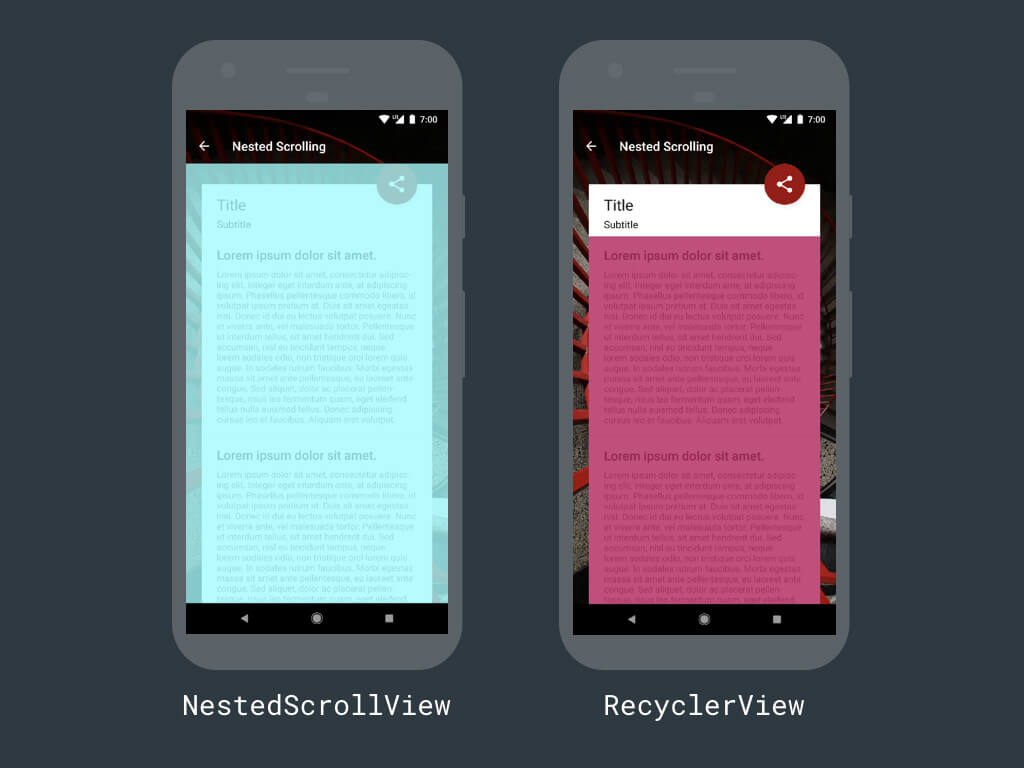
NestedScrollingParent를 구현한 부모뷰와, NestedScrollingChild를 구현한 자식뷰가 필요합니다. 아래의 Figure 3에서 보듯이, 샘플에서는 NestedScrollView (이하 NSV)를 부모 뷰로, RecyclerView (이하 RV)를 자식 뷰로 사용했습니다.
사용자가 RV를 스크롤한다고 가정해봅시다. Nested Scrolling이 없다면, RV는 스크롤 이벤트를 즉시 소비할 것이므로, Figure 2에서 보았던 동작대로 구현되지 않을 것입니다. 우리의 기대결과는 두 뷰가 마치 하나의 유닛처럼 함께 스크롤되는 것입니다. 더 구체적으로는...(1)
- RV가 자신의 내용의 최상단을 보여주고 있다면, RV를 위로 스크롤링 하는 동작은 NSV가 위로 스크롤되는 동작으로 이어져야 합니다.
- NSV가 자신의 내용의 최하단을 보여주고 있지 않다면, RV를 아래로 스크롤링 하는 동작은 NSV가 아래로 스크롤되는 동작으로 이어져야 합니다.
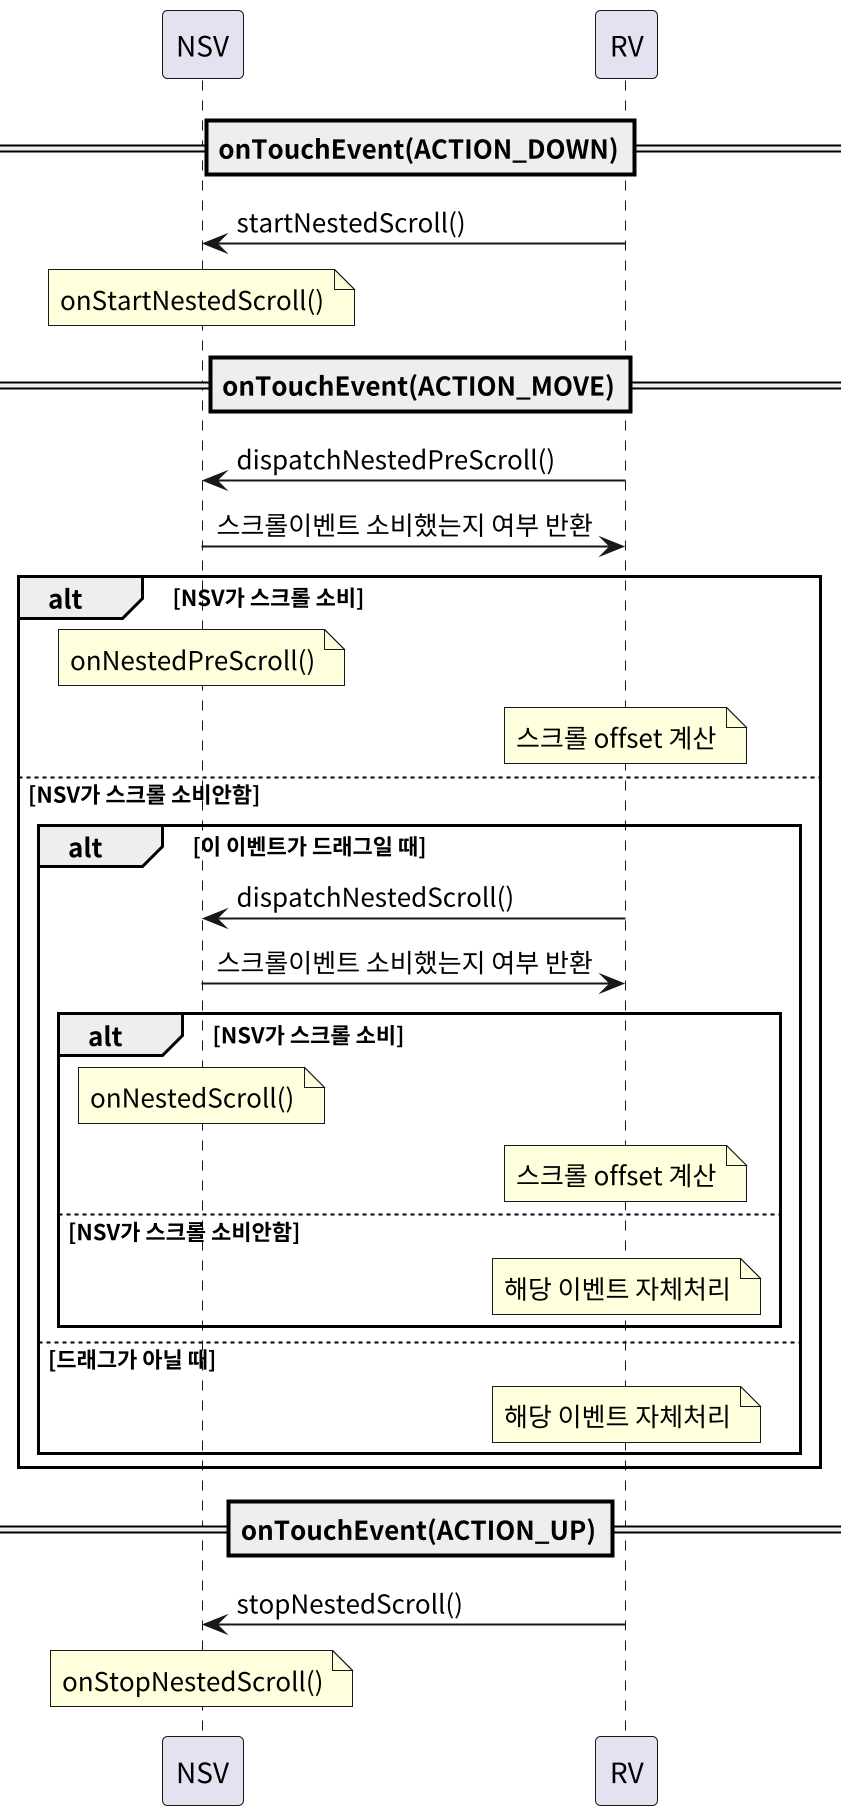
당신이 기대한대로, Nested Scrolling API들은 스크롤 동작을 수행하는 동안, NSV(부모)와 RV(자식)간에 서로의 소통하는 방법을 제공하여, 어떤 뷰가 스크롤 이벤트를 처리할지 결정하는 기능을 제공합니다. 이것은 사용자가 RV에 드래그 동작을 수행했을 떄의 이벤트 흐름을 살펴본다면 명확해집니다.
- RV의
onTouchEvent(ACTION_MOVE)메서드가 호출됩니다. - RV는 자신의
dispatchNestedPreScroll()메서드를 호출합니다. 이 메서드는 NSV에게 스크롤의 일부분을 소비할꺼라고 알려줍니다. - NSV의
onNestedPreScroll()메서드가 호출됩니다. 이 때, RV가 스크롤이벤트를 소비하기 전에, NSV가 먼저 스크롤에 반응할 기회를 얻게 됩니다. - RV는 NSV가 소비하고 남은 스크롤을 소비합니다. (NSV가 모두 소비했다면, RV는 아무런 동작도 수행하지 않습니다.)
- RV는 자신의
dispatchNestedScroll()메서드를 호출합니다. 이 메서드는 NSV에게 자신(RV)가 얼마나 스크롤을 소비했는지를 알려줍니다. - NSV의
onNestedScroll()메서드가 호출됩니다. 이 때, NSV는 아직 소비되지 않고 남아있는 스크롤을 소비할 기회를 얻게 됩니다. - RV는
onTouchEvent(ACTION_MOVE)호출에 대해 이벤트를 소비했으므로 true를 반환합니다.(2)
불행하게도, 단순히 NSV, RV를 사용하는 것으로는 제가 원했던 스크롤링 동작을 구현하기에 충분하지 않았습니다. Figure 4는 제가 고쳤어야 했던 문제점 2가지를 보여주고 있습니다. 두 문제점의 원인은 RV가 이벤트를 처리하면 안될 때, Scroll / Fling 이벤트를 처리했던 것입니다. Figure 4의 왼쪽은, 카드가 화면의 상단에 도달할때까지 RV가 이벤트를 처리해서는 안됩니다.(RV가 스스로 이벤트를 처리해서 버그) 오른쪽은, RV를 아래쪽으로 Fling하는 이벤트가 하나의 부드러온 무션으로 카드를 Collapse 상태로 만들었어야 했습니다.
Figure 4: https://www.androiddesignpatterns.com/assets/videos/posts/2018/01/24/nested-scrolling-bugs1-opt.mp4
Nested Scrolling API가 어떻게 동작하는지 이해했으므로, 이 문제를 고치는것은 상대적으로 간단합니다.
NestedScrollView를 상속받아 새로운 클래스를 생성하고, onNestedPreScroll(), onNestedPreFling() 메서드를 오버라이드하여 스크롤링 동작을 커스터마이징 합니다./**
* A NestedScrollView with our custom nested scrolling behavior.
*/
public class CustomNestedScrollView extends NestedScrollView {
// The NestedScrollView should steal the scroll/fling events away from
// the RecyclerView if: (1) the user is dragging their finger down and
// the RecyclerView is scrolled to the top of its content, or (2) the
// user is dragging their finger up and the NestedScrollView is not
// scrolled to the bottom of its content.
@Override
public void onNestedPreScroll(View target, int dx, int dy, int[] consumed) {
final RecyclerView rv = (RecyclerView) target;
if ((dy < 0 && isRvScrolledToTop(rv)) || (dy > 0 && !isNsvScrolledToBottom(this))) {
// Scroll the NestedScrollView's content and record the number of pixels consumed
// (so that the RecyclerView will know not to perform the scroll as well).
scrollBy(0, dy);
consumed[1] = dy;
return;
}
super.onNestedPreScroll(target, dx, dy, consumed);
}
@Override
public boolean onNestedPreFling(View target, float velX, float velY) {
final RecyclerView rv = (RecyclerView) target;
if ((velY < 0 && isRvScrolledToTop(rv)) || (velY > 0 && !isNsvScrolledToBottom(this))) {
// Fling the NestedScrollView's content and return true (so that the RecyclerView
// will know not to perform the fling as well).
fling((int) velY);
return true;
}
return super.onNestedPreFling(target, velX, velY);
}
/**
* Returns true iff the NestedScrollView is scrolled to the bottom of its
* content (i.e. if the card's inner RecyclerView is completely visible).
*/
private static boolean isNsvScrolledToBottom(NestedScrollView nsv) {
return !nsv.canScrollVertically(1);
}
/**
* Returns true iff the RecyclerView is scrolled to the top of its
* content (i.e. if the RecyclerView's first item is completely visible).
*/
private static boolean isRvScrolledToTop(RecyclerView rv) {
final LinearLayoutManager lm = (LinearLayoutManager) rv.getLayoutManager();
return lm.findFirstVisibleItemPosition() == 0
&& lm.findViewByPosition(0).getTop() == 0;
}
}
거의 다 완성되었지만, Figure 5에서처럼 하나의 버그가 더 존재합니다. 비디오의 왼쪽에서는 fling 동작이 자식의 컨텐츠 상단에 도달하는 순간 갑자기 멈춥니다. 우리는 오른쪽 비디오처럼 끊기지않는 하나의 액션으로 fling동작을 완성할 수 있을까요?
Figure 5: https://www.androiddesignpatterns.com/assets/videos/posts/2018/01/24/nested-scrolling-bugs2-opt.mp4
이 문제의 핵심은 자식의 fling 속도를 부모한테 전달하는 로직이 support library에서 빠져있었다는 것입니다. 이 문제에 대해서는 Chris Banes가 자신의 블로그에 증상과 해결방안을 상세하게 포스트했으므로 설명을 생략합니다. (3) 해결책을 요약하자면, v26 support library에서 문제를 해결한
NestedScrollingParent2, NestedScrollingChild2 인터페이스를 지원하기 시작했습니다. 그러므로, 이 인터페이스를 이용해 구현한다면 문제를 해결할 수 있습니다.
아쉽게도, NestedScrollView는 여전히 이전의
NestedScrollingParent 인터페이스를 구현하고 있습니다. 그러므로, 저는 NestedScrollingParent2 인터페이스를 구현한 NestedScrollView2를 따로 만들었습니다. 아래의 코드는 최종적으로 완성한 NestedScrollVivew 코드입니다. (NestedScrollView2 소스코드)/**
* A NestedScrollView that implements the new-and-improved NestedScrollingParent2
* interface and that defines its own customized nested scrolling behavior. View
* source code for the NestedScrollView2 class here: j.mp/NestedScrollView2
*/
public class CustomNestedScrollView2 extends NestedScrollView2 {
@Override
public void onNestedPreScroll(View target, int dx, int dy, int[] consumed, int type) {
final RecyclerView rv = (RecyclerView) target;
if ((dy < 0 && isRvScrolledToTop(rv)) || (dy > 0 && !isNsvScrolledToBottom(this))) {
scrollBy(0, dy);
consumed[1] = dy;
return;
}
super.onNestedPreScroll(target, dx, dy, consumed, type);
}
// Note that we no longer need to override onNestedPreFling() here; the
// new-and-improved nested scrolling APIs give us the nested flinging
// behavior we want already by default!
private static boolean isNsvScrolledToBottom(NestedScrollView nsv) {
return !nsv.canScrollVertically(1);
}
private static boolean isRvScrolledToTop(RecyclerView rv) {
final LinearLayoutManager lm = (LinearLayoutManager) rv.getLayoutManager();
return lm.findFirstVisibleItemPosition() == 0
&& lm.findViewByPosition(0).getTop() == 0;
}
}
(1) 이 게시물에서는 프레임워크가 스크롤 방향을 설명하기 위해 사용하는 용어와 동일하게 용어를 사용합니다. 즉, 손가락을 스크린의 아래로 드래그하면 뷰는 위로 스크롤되고, 손가락을위로 스크롤하면 뷰가 아래로 스크롤됩니다.
(2) nested Fling 이벤트도 비슷한 방식으로 처리됩니다. 자식뷰가
(3) 이 주제에 대해 더 많은 정보를 얻으려면 Chris Banes의 Droidcon 2016 talk 영상 시청을 추천합니다.
(2) nested Fling 이벤트도 비슷한 방식으로 처리됩니다. 자식뷰가
onTouchEvent(ACTION_UP) 콜백으로부터 fling 제스쳐를 감지하면, dispatchNestedPreFiling(), dispatchNestedFling() 메서드를 호출하여 부모에게 fling의 정보를 알려줍니다. 부모뷰는 onNestedPreFling(), onNestedFiling() 메서드를 통해 각각 전달된 정보를 이용해 자식보다 먼저 fling 이벤트를 소비할 수 잇습니다.(3) 이 주제에 대해 더 많은 정보를 얻으려면 Chris Banes의 Droidcon 2016 talk 영상 시청을 추천합니다.
Append
- Chris Banes의 블로그에 따르면, fling 버그는 Support Library 26.0.0-beta2에서 해결되었다고 합니다.
- NestedScrollingChild / NestedScrollingParent 구현체
- NestedScrollingChild 구현 View
- BaseGridView
- HorizontalGridView
- NestedScrollView
- RecyclerView
- SwipeRefreshLayout
- VerticalGridView
- WearableRecyclerView
- NestedScrollingChild2 구현 View(v26)
- BaseGridView
- HorizontalGridView
- NestedScrollView
- RecyclerView
- VerticalGridView
- WearableRecyclerView
- NestedScrollingParent 구현 View
- CoordinatorLayout
- NestedScrollView
- SwipeRefreshLayout
- WearableDrawerLayout
- NestedScrollingParent2 구현 View(v26)
- CoordinatorLayout
- NestedScrollingChild 구현 View
- Nested Scroll Event 플로우
- NSV(NestedScrollView) : NestedScrollParent
- RV(RecyclerVIew) : NestedScrollChild

